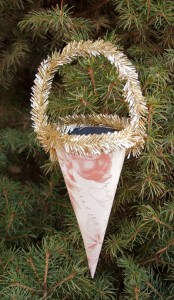
 We hope you will enjoy making this beloved decoration. Depending on the paper you use, and the embellishments you choose, your cones can be very simple, very elegant, or anything in between. The materials are easy to obtain, and the technique for making them can be mastered by even the very young.
Materials:
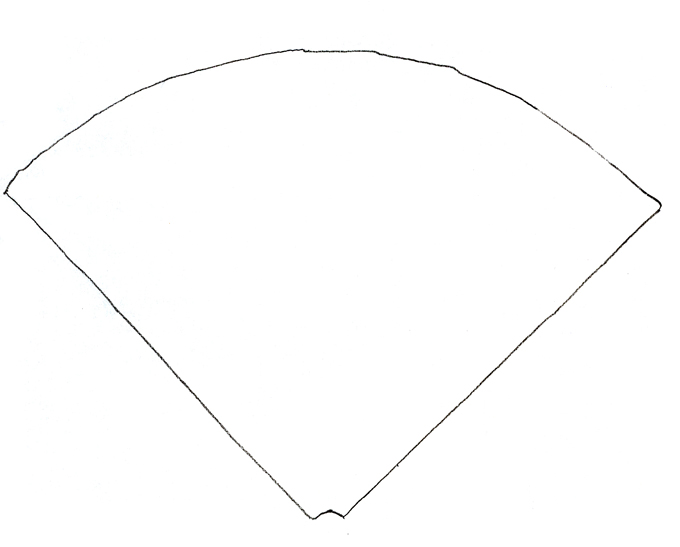
Paper – there are many decorative papers available. If the cone is to be left open (to be filled with small items later) you may want to consider paper that is printed, or has color on both sides. Construction paper also works. Avoid heavy card stock, or cardboard, as they will not easily “bend” into the cone shape needed. Our cones will be made from a quarter circle that measures 5 inches on the side, so you can get four cones from a piece of paper that is 12 inches square.
Decorations – Your imagination is the limit. You can use nearly any trim; lace, yarn, beads, or even macaroni. You will want to trim the top edge of your cone, and also add a loop of ribbon for hanging the cone. You can also cover your cone with lace or fabric. Please note: Do not apply any embellishments until you have formed the cone and glued it in place. If you put anything on the paper while it is flat, you will not be able to form it into a smooth cone.
Glue – Any glue suitable for paper will work. I prefer to use “Tacky Glue” because it dries quickly. You can try using hot glue (not recommended for use with children), but I find that it hardens too quickly to get the cone edges to line up properly.
The paper cone pattern is at the end of this post. Click on the pattern and either print from the image or save to your computer and print from there.Measure to be sure that one side measures 5 inches. You can make small adjustments as required.
- Trace the pattern to the back side of your paper, and cut it out.
- Roll the cut out paper into a cone. It is important to get a nice sharp point on the small end. The straight edges should overlap evenly from top to tip – a bit less than a quarter inch all the way down the side.
- Once you are happy with the shape of the cone, apply a small bead of glue all the way along one straight edge, overlap the edges, and hold them together for a minute until the glue dries enough for them to stay put.
- Apply a decorative trim around the top edge by applying a bead of glue, and laying the trim even with the top edge of the cone.
- Add a handle by fastening a loop of ribbon from one side of the top edge of the cone to the other.
- Your cone is ready to fill with a small surprise!
Variations: Use embossed paper to add texture to your cone, or glue fabric or an appliqué to the cone. Make two cones of different colors, and nest them together to make a cone that has a different color inside than outside. Use floral foil to make cones that sparkle. Add Victorian stickers to the outside of the assembled cone. Fill the cone with batting, and cover the top with fabric (so the cone will resemble an ice cream cone) and then glue ribbon flowers or purchased silk flowers to the fabric. Have fun!












Leave A Comment